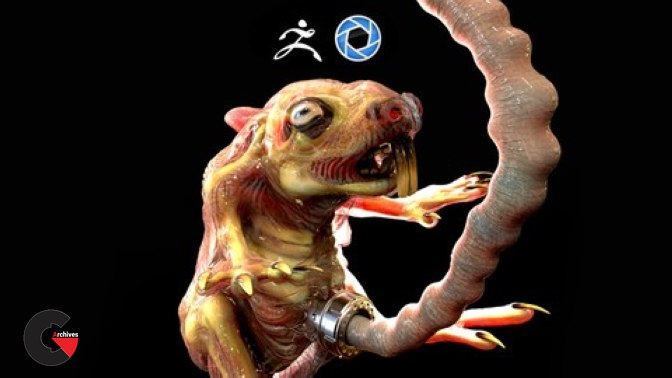
Character Creation with ZBrush r7 and rendering in Keyshot 5
Character Creation with ZBrush
Character Creation with ZBrush : This course 3D Concepts and Character creation will teach you how to concept in 3D with confidence – Software: ZBrush r7 for modelling and texturing and Keyshot 5 for high quality rendering.In this course we will be using ZBrush and Keyshot exclusively as well as final editing in Photoshop (but any image manipulation sofware will do as we will simply be compiling).This course is intended for anyone wanting to know techniques for modelling and sculpting digitally, ZBrush is the premiere program for digital sculpting it is extremely powerful, we will be harnessing some of that power to create fantastic sculpt very quickly and also rendering out using keyshot 5, finally putting it together in Photoshop.If your into ZBrush this is the course for you we cover all the main sculpting techniques as well as a few tips and tricks.If you are learning Keyshot this course will be of great help to you as well.
Section 1: Introduction and Files for ZBrush and Keyshot
- Lecture 1 Lets get everything ready!
- Lecture 2 Files and Info
Section 2: Start modelling with ZBrush
- Lecture 3 Introduction
- Lecture 4 Navigation in ZBrush
- Lecture 5 Creating our base mesh in ZBrush
- Lecture 6 Making an adaptive skin to work on our sculpt within ZBrush
- Lecture 7 Working once to do both sides using symetry within ZBrush
- Lecture 8 Adjusting and Moving our base mesh in ZBrush
- Lecture 9 The power of Dynamesh
- Lecture 10 Learn the beneifts of dynamesh in ZBrush
- Lecture 11 Low-resolution remeshing in ZBrush
- Lecture 12 Learning to Build form into our sculpt in ZBrush
- Lecture 13 What we have done so far
- Lecture 14 Using the inflate and increasing the dynamesh resolution
- Lecture 15 Using the polishing and smoothing tools
- Lecture 16 Masking and translating in ZBrush
- Lecture 17 Slight masking modifications and smoothing our ZBrush sculpt
- Lecture 18 Ready to add a subtool in ZBrush?
- Lecture 19 Quick Sketch
- Lecture 20 Intro to time lapse
- Lecture 21 Timelapse
- Lecture 22 Explain timelapse
- Lecture 23 Modifictations
- Lecture 24 Creating the Ambilicle Cord
- Lecture 25 Joint hardsurface
- Lecture 26 Remeshing for low res version
- Lecture 27 Using guides to reflow the topology
- Lecture 28 Refrences
- Lecture 29 Creating Skin Folds
- Lecture 30 Creating Wrinkles
- Lecture 31 Timelapse Wrinkles
- Lecture 32 Out of Symetry
- Lecture 33 Adding more details part 1
- Lecture 34 Adding more details part 2
- Lecture 35 Creating a substructure bones and muscle
- Lecture 36 Building the Container
- Lecture 37 ZRmodeller recap analysis
- Lecture 38 Creating the liquid base
- Lecture 39 Sculpting the mouth
- Lecture 40 Sculpting the mouth part 2
- Lecture 41 The teeth
- Lecture 42 Masking the deep wrinkles
- Lecture 43 Timelapse for wrinkles
- Lecture 44 Fibre mesh a quick look
- Lecture 45 Crteating Whiskers
- Lecture 46 Create fibres for body
Section 3: Texturing and UV Layouts
- Lecture 47 Painting our base colour
- Lecture 48 Noodling
- Lecture 49 Layer painting
- Lecture 50 Layer painting part 2
- Lecture 51 Creating a cavity mask
- Lecture 52 Adding the claws
- Lecture 53 Base colours and Materials
- Lecture 54 Colouring our parts
- Lecture 55 Using Spotlight to add textures
- Lecture 56 UV Master intro
- Lecture 57 UVs and our model
- Lecture 58 Lets now unwrap our model
- Lecture 59 Baking our layer down
- Lecture 60 Setting up our maps
- Lecture 61 Quick look so far
- Lecture 62 Posing our sculpt with T-Pose intro
- Lecture 63 T-Pose our sculpt
- Lecture 64 Export out non UV parts
- Lecture 65 Exporting our UV parts
Section 4: Keyshot Set up and rendering
- Lecture 66 Quick look at Keyshot
- Lecture 67 Adding/Importing our Tools to Keyshot
- Lecture 68 Adding/Importing our Tools to Keyshot part 2
- Lecture 69 Adding/Importing our Tools to Keyshot part 3
- Lecture 70 Setting groups and refractions
- Lecture 71 Adding Light Sources
- Lecture 72 Intro to Opacity maps
- Lecture 73 Creating our Opacity Maps
- Lecture 74 Creating our Specular map
- Lecture 75 Setting up our cameras
- Lecture 76 Setting up and doing a pre check for our render
- Lecture 77 Our final render set up
- Lecture 78 Importing Layers to Photoshop
- Lecture 79 Our Final Render
lB6MwSwNNIYYHz66UqInBRH/video%20g/32194
Direct download links 2.5 GB :

Direct download link reserved for subscribers only This VIP
Dear user to download files, please subscribe to the VIP member
- To activate your special membership site, just go to this link and register and activate your own membership . >>>register and activate<<<
- You can subscribe to this link and take advantage of the many benefits of membership.
- Direct downloads links
- No ads No waiting
- Download without any limitation ، all content in website
CGArchives Is The Best
Review
Review
Review this tutorial