Gumroad – Painting a Realistic Skin Texture using Mari
Painting a Realistic Skin Texture
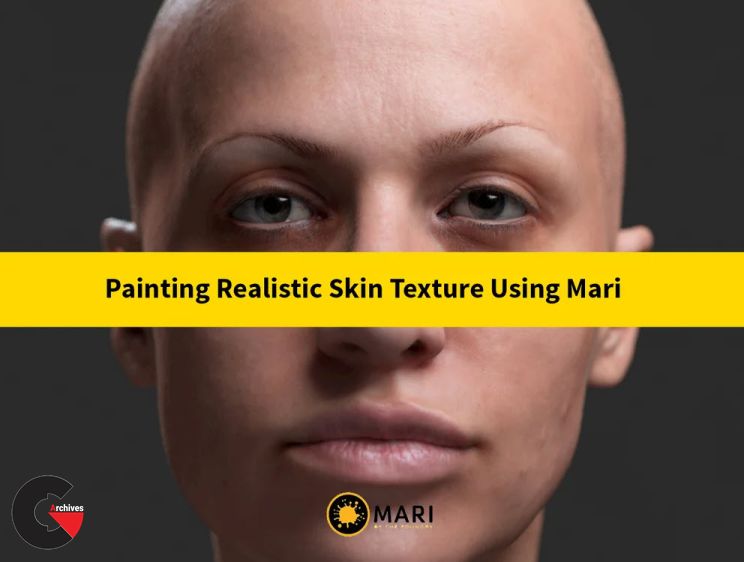
Painting a Realistic Skin Texture : In more than 3 hours of video material I’ll recreate my entire “Josie” image artwork from scratch, showing the step-by-step processes behind the creation of the 17 maps
The course will also feature some background lessons like a brief introduction to Mari, texture cleaning and preparation in Photoshop and other technical explanations, so that everyone can follow the entire course easily.
What’s inside:
- – 19 video lessons + Bonus lessons (*will be added in a few days).
- – head .obj file
- – photo references
- – course description (pdf)
Lesson 01:
Introduction to Mari Brief overview of the user interface, controls and instructor’s preferred workflow.
Lesson 02:
Texture Cleaning and Preparation How to prepare textures to be used inside Mari. Cleaning Highlights and producing an albedolike texture.
Lesson 03:
Bit Depths Technical background behind the concept of bit depths and their importance.
Lesson 04:
Diffuse Map How to create a diffuse color channel from a set of photo references.
Lesson 05:
Shallow SSS map How to create the one of the essential SSS components.
Lesson 06:
Mid SSS map The second element needed to build a good SSS skin shader.
Lesson 07:
Deep SSS map The third SSS component and its colors.
Lesson 08:
Deep Mask Controlling deep map influence.
Lesson 09:
Primary Specular map The main specular map, regions and intensities.
Lesson 10:
Secondary Specular map Enhancing facial features and reflections.
Lesson 11:
Glossy map Tight vs broad reflections.
Lesson 12:
Bump Map Augmenting high frequency details.
Lesson 13:
Displacement textures Preparing Surface Mimic’s* textures to be used inside Mari.
Lesson 14:
Displacement Map Creating a full displacement map based on textures from previous lesson.
Lesson 15:
Eyes Diffuse map Iris and Sclera color map.
Lesson 16:
Eyes Specular map Giving life to the eyes.
Lesson 17:
Eyes Bump map Adding volume to veins and iris.
lB6MwSwNNIYYHz66UqInBRH/video%20g/33127
Direct download links 5.6 GB :

Direct download link reserved for subscribers only This VIP
Dear user to download files, please subscribe to the VIP member
- To activate your special membership site, just go to this link and register and activate your own membership . >>>register and activate<<<
- You can subscribe to this link and take advantage of the many benefits of membership.
- Direct downloads links
- No ads No waiting
- Download without any limitation ، all content in website
CGArchives Is The Best
Review
Review
Review this tutorial