CGMaster Academy – Hard Surface Modeling for Characters
 Hard Surface Modeling
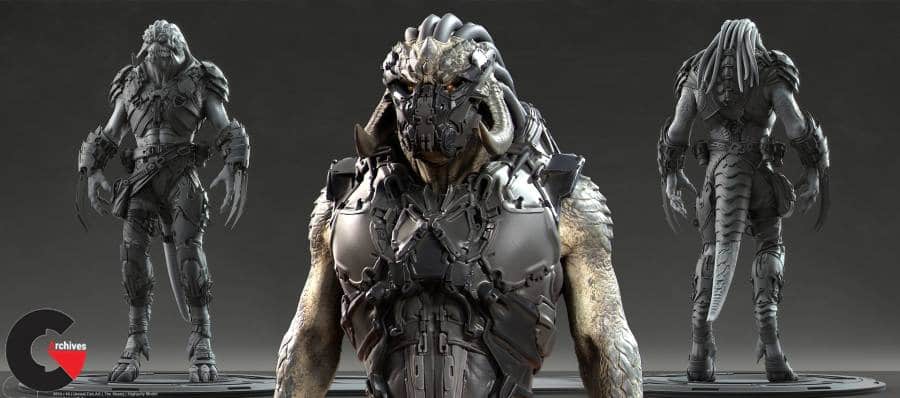
Hard Surface Modeling for Characters : Throughout this course we are going to take a look at the techniques and challenges of designing and building hard surfaces for characters. This does not only include design, sculpting, and modeling, but especially the focus on creating character hard surfaces with animation in mind from the very beginning. The goal is to get students to look at the subject matter from a new perspective and to take away as much knowledge, tips, tricks, and techniques as possible for use in their own work.
COURSE FORMAT: Standard
LECTURE TYPE: Pre-recorded
FEEDBACK: Individually recorded
DURATION: 6 weeks
MATERIALS: Photoshop, ZBrush and 3D packages such as Maya, 3Dsmax, Modo, or else should be known to follow along
SKILLS LEVEL: Intermediate
PREREQUISITES: Knowledge of ZBrush and 3D packages such as Maya, 3Dsmax, Modo; | Some basic but solid anatomy knowledge is a plus for having a base body model to get started | Basic knowledge of Photoshop
The more you know, the better.
Week 1 | Introduction / Character Preparation / Hard Surface Talk
Taking a look at the difference between hard surface modeling and organic modeling (deformation) | Design principles and challenges when building hard surfaces for characters | Have a look at the character concept (background story, design breakdown, reference used) | Evaluating design for required range of motion
Week 2 | Design Focus: Basic Armor Blockout and Insight Into Design Process
Quick intro to ZBrush toolset and personal layout for the basic hard surface blockout | Blocking out the basic/primary shapes of the hard surface and clothing | Designing the back of the character during blockout (on the fly design without 2D concept) | Explaining ZBrush workflow, tools used and design decisions while sculpting the concept model
Week 3 | Motion Focus: Range of Motion Tests and Necessary Edits
Using ZRemesher and Decimation Master to create a quick low res version of the base body | Building a simple rig inside of Maya for motion tests |Testing key poses of the character and talking about feedback from the Rigger | Evaluating and applying design changes to the model in order to meet requirements to range of motion and deformation | Testing design changes again on the rig
Week 4 | Editing details, preparation for remodeling | Retopo
Building and using custom brushes for hard surface detail | Sculpting smaller shapes, details and bringing concept sculpt to final | Stage for cleanup and remodeling | Some rules and guidelines for adding detail to hard surfaces | Showing techniques of cleaning up hard surface parts for texture baking
Week 5 | Remodeling | Retopo of the Character
Decimating the character and exporting him into another 3D package (here: Maya and Modo) | Setting up the scenes for retopo | Showing first of two ways of remodeling the character: Sub-D/Highres modeling for offline rendering or texture baking.
Week 6 | Remodeling for Game Mesh
Showing second of two ways of remodeling the character: Low res modeling for real time rendering (games). | Topology guidelines for real time mesh (geometry examples, overpaints): polygon budget, technical requirements for the mesh such as LODs, Uvs, rigging, character variation etc.
Watch the Introduction Video :
lB6MwSwNNIYYHz66UqInBRH/video%203/26864
Direct download links 15 GB :
Direct download link reserved for subscribers only This VIP
Dear user to download files, please subscribe to the VIP member
- To activate your special membership site, just go to this link and register and activate your own membership . >>>register and activate<<<
- You can subscribe to this link and take advantage of the many benefits of membership.
- Direct downloads links
- No ads No waiting
- Download without any limitation ، all content in website
CGArchives Is The Best
Review
Review
Review this tutorial
 Hard Surface Modeling
