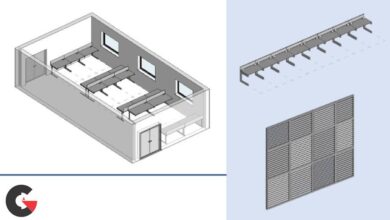
Architectural Interior Visualization in V-ray 3.0
 Architectural Interior Visualization
 Architectural Interior Visualization
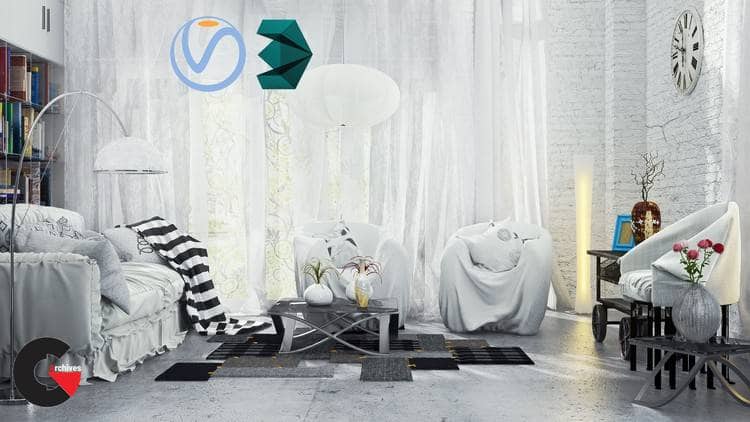
Architectural Interior Visualization in V-ray 3.0 : In this tutorial we will start by modeling our building in ArchiCAD using our AutoCAD imported plan. We will talk about many aspects of modeling in ArchiCAD such as adding walls, windows, doors, creating stairs, copying and injecting data and …
Requirements
- The following software will be needed :
- 3Ds Max, V-Ray, ArchiCAD, Marvelous Designer, MeshLab (free software), Photoshop
Although this part is done completely in ArchiCAD but most off the procedure is the same in Autodesk Revit. We will then add some other elements in 3Ds max after importing our model.
We will use 3Ds max to model most of our furniture including the bases for Marvelous Designer. A combination of spline modeling as well as high poly modeling and surfacing will be used.
All of our resting furniture will be built in Marvelous Designer, which will include importing and exporting to and from Marvelous Designer, simulating techniques, decimation in MeshLab and …
We will then continue to adding some shaders to our objects in 3Ds max and V-ray. A combination of V-ray material, V-ray Blend material, V-ray 2-sided material, V-ray displacement and some other materials will be used.
For the lighting process we will learn techniques on when and how to use different V-ray lights and ways to optimize those lights to get a reasonable render time.
In the rendering stage we will try to use some of the new features of V-ray 3.0 to speed up rendering and also simpler ways to get rid of artifacts. A whole bunch of render elements will be exported out including light select element, Multi Matte, reflection, refraction, GI, lighting, shadow and a few more to be used in Photoshop.
The last part of this tutorial will be compositing in Photoshop. We’ll use every single render element that we exported out from V-ray to come up with the final image that you can see.
The full size image can be seen Here !
A more detailed breakdown is as follows,
Difficulty Level : Advanced
Main Software Used in,
Modeling, Simulation : ArchiCAD, 3Ds Max, Marvelous Designer, MeshLab (free)
Rendering : V-ray 3.0
Post Production : Photoshop
The tutorial will cover,
In Modeling :
- Customizing the UI using scripts.
- Using Marvelous Designer to model every piece of resting furniture; all the couches , sofas, pillows, chair.
- Spline modeling in conjunction with some modifiers , including ; tables, the floor lamp, vases, wall clock.
- Using V-ray fur for the floor carpet.
- Using ATree free script to create flowers and plants.
- Using V-ray displacement to create cutouts.
- Optimizing V-ray displacement to areas that are seen through the camera for memory optimization.
- Using ArchiCAD to model the building and refining in 3Ds Max.
- Using some free scripts to place books in bookshelf randomly.
- Using Animation tools to scatter objects on our models.
- Using graphite modeling tool-set
In Shading :
- Using V-ray blend to create complex materials .
- Using quick scripts to interactively see the results of complex textures without the need of full rendering.
- Using V-ray 2 sided to create translucency for objects.
- Creating worn out edges with the use of V-ray displacement and V-ray Dirt.
- Optimizing all scene materials to have the best quality n the least rendering time.
- Most of the materials in the scene are made of complicated shading networks
In Rendering:
- Using V-ray 3.0’s new features that will help in rendering this scene faster and modifiable.
- make use of all different V-ray lights and how to optimize those and a general lighting solution which will work in many interior scenes.
- Rendering many different render passes including masks for all materials, separating lights, reflection, refraction and ….
In compositing:
- Layering all our different passes together to achieve a result we want.
- Changing the individual lights effect in our scene without the need to re-rendering.
- Color correcting many of our elements with ease using the masks that we rendered out.
- Adding extra texture to some objects and learn how to blend them nicely with the scene.
You’ll get all the lessons plus every single asset that was used in creating this tutorial including models, textures, renders, Photoshop files, …
The running time of the course is above 7 hours and you should be able to complete the course in 20-30 hours based on your previous knowledge/experience in the taught software.
This course is recommended for those who want to learn every step needed to visualize an interior scene from scratch to be able to produce a photo-realistic looking image.
Who this course is for:
- Intermediate to Advanced Users
What you’ll learn
- Learn how to model, shade, render and composite an interior scene completely from scrat
lB6MwSwNNIYYHz66UqInBRH/video/7453
Direct download links 3.22 GB :

Direct download link reserved for subscribers only This VIP
Dear user to download files, please subscribe to the VIP member
- To activate your special membership site, just go to this link and register and activate your own membership . >>>register and activate<<<
- You can subscribe to this link and take advantage of the many benefits of membership.
- Direct downloads links
- No ads No waiting
- Download without any limitation ، all content in website
CGArchives Is The Best
Review
Review
Review this tutorial