Photorealistic Product Rendering with KeyShot
 Photorealistic Product Rendering
 Photorealistic Product Rendering
Photorealistic Product Rendering with KeyShot : Learn to create realistic visuals of objects from scratch before they are manufactured.
The design and shape of an object not only have they power to communicate–they also have the ability to solve everyday problems. Industrial designer Nicolás Robertson is a firm believer that 3D design is the key to improving the creation process by allowing clients to visualize products before manufacture.
Learn how to create photorealistic renders of any 3D object using KeyShot. By the end of this course, you’ll know how to design objects from your imagination and give them a realistic look by applying light, other materials and retouching techniques.
Begin the course by getting to know your teacher, Nicolás Robertson. He tells you a bit about himself, what he does, and why he believes that 3D visualization is essential for design and architecture. He also shares some of his biggest influences and gives you an overview of the final project.
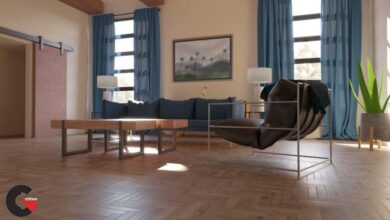
Review the key concepts of photorealism and see a few examples of simple studio lighting systems. Go over the basic principles of different types of materials and compile reference images for your furniture mood board.
Now it’s time to get to work in KeyShot. Start by importing your model and then get familiar with the program by exploring the interface and its main features. Learn how to assign materials to objects, add lighting to your scene, and create a set of cameras. Nicolás explains how each of these elements affects the look and composition of your image. Finally, adjust the settings of your file and prepare it for rending.
Now that you’ve covered the basics, explore different ways to make your scene more realistic, from adding new elements, like walls or objects, to advanced lighting and material techniques. Then, learn how to optimize the rendering process
Wrap up the course by adding the final touches on your project. Much like how professional photographers edit their photos to give them a signature style, 3D artists can enhance their work in post-production. Nicolás shows you a series of tricks in both KeyShot and Photoshop to polish your work and give it a professional look.
What is this course’s project?
Create a render of a piece of furniture from scratch and give it a photorealistic look by applying light, other materials, and retouching techniques.
Who is it for?
- Designers, architects, engineers, and anyone interested in bringing their ideas to life and creating realistic visualizations of products, furniture, and other related objects.
What you need
- This course is designed for beginners, but some basic knowledge of 3D is helpful.
- The only materials needed for this course are a mid-range to high-end computer with KeyShot and Photoshop.
lB6MwSwNNIYYHz66UqInBRH/video%206/45709
Direct download links 2.7 GB :

Direct download link reserved for subscribers only This VIP
Dear user to download files, please subscribe to the VIP member
- To activate your special membership site, just go to this link and register and activate your own membership . >>>register and activate<<<
- You can subscribe to this link and take advantage of the many benefits of membership.
- Direct downloads links
- No ads No waiting
- Download without any limitation ، all content in website
CGArchives Is The Best
Review
Review
Review this tutorial