Designing for Laser Cutting with Fusion 360
 Designing for Laser Cutting
 Designing for Laser Cutting
Designing for Laser Cutting with Fusion 360 : Fusion 360 is a CAD software that allows to create both parametric and direct modeling but did you know that it is possible to use it to create laser cut 3D objects? Indeed, thanks to the sketch base design, Fusion 360 has the functionalities to create DXF files that can be used for laser cutting. In this article, learn how to turn Autodesk Fusion 360 projects into laser cut objects.
What Is Fusion 360?
Fusion 360 is a powerful and ergonomic CAD software developed by Autodesk. Designed for small and medium companies, the software is great for collaborating on projects. It includes parametric modeling, direct modeling, sketching, sculpting, CAM, rendering and simulations for designers and engineers. The software is designed around a cloud integration, allows easy collaboration and access to files from anywhere. It is also free for students and hobbyists.
Laser Cutting or 3D Printing?
When the time comes to choose the right technology for a project, many elements are involved: application, material, production time and cost.
3D printing has a main advantage over traditional manufacturing techniques: the cost is not driven by the amount of unit you produce which means you can produce a single part or small to medium batches at a lower price than with the injection molding technique for example.
With laser cutting, production time is very short and price is low. The raw material is easy to access and available in many material types (metals, plastics, acrylics, cardboard). Moreover, you can add different types of engraving on your material.
Use Fusion 360 CAD Software for Laser Cutting
Introduction
Fusion 360 is a CAD software that allows to create both parametric and direct modeling but did you know that it is possible to use it to create laser cut 3D objects? Indeed, thanks to the sketch base design, Fusion 360 has the functionalities to create DXF files that can be used for laser cutting. In this article, learn how to turn Autodesk Fusion 360 projects into laser cut objects.
What Is Fusion 360?
Fusion 360 is a powerful and ergonomic CAD software developed by Autodesk. Designed for small and medium companies, the software is great for collaborating on projects. It includes parametric modeling, direct modeling, sketching, sculpting, CAM, rendering and simulations for designers and engineers. The software is designed around a cloud integration, allows easy collaboration and access to files from anywhere. It is also free for students and hobbyists.
If you want to learn how to prepare your 3D file with Fusion 360, you can check our tutorial on the software.
Laser Cutting or 3D Printing?
When the time comes to choose the right technology for a project, many elements are involved: application, material, production time and cost.
3D printing has a main advantage over traditional manufacturing techniques: the cost is not driven by the amount of unit you produce which means you can produce a single part or small to medium batches at a lower price than with the injection molding technique for example.
To discover how you can produce with 3D printing, please visit this page.
Box LC Fusion360
With laser cutting, production time is very short and price is low. The raw material is easy to access and available in many material types (metals, plastics, acrylics, cardboard). Moreover, you can add different types of engraving on your material.
Learn more about our laser cutting service on our website.
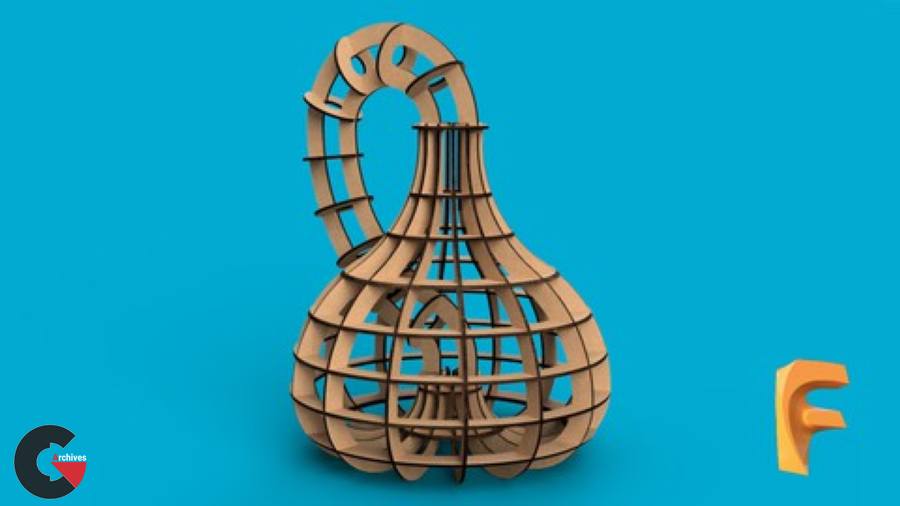
From 3D to 2D with Fusion 360
Normally when using a CAD modeling software, design is made from 2D sketches to 3D objects by extruding. In this tutorial, you will learn how we create 3D objects with laser cutting thanks to assembly.
Modeling the box with sketches
Let’s start by creating a sketch for the base of the box.
If you are going to design an object with multiple drawings, it is important to rename each sketch carefully.
Create a square shape of 100 mm of width and extrude it of the thickness of your material. Then, create one of the sides of the box by creating a sketch directly on the side of the base of the box. If you want to create joint features, use the line tool to sketch on your face. Then, use the intersect boolean operation to obtain the cut side of the box with your joints.
lB6MwSwNNIYYHz66UqInBRH/video%205/43449
Direct download links 2.5 GB :

Direct download link reserved for subscribers only This VIP
Dear user to download files, please subscribe to the VIP member
- To activate your special membership site, just go to this link and register and activate your own membership . >>>register and activate<<<
- You can subscribe to this link and take advantage of the many benefits of membership.
- Direct downloads links
- No ads No waiting
- Download without any limitation ، all content in website
CGArchives Is The Best
Review
Review
Review this tutorial