Architectural visualization with 3ds Max 2022 and Corona Renderer 7
 Architectural visualization
 Architectural visualization
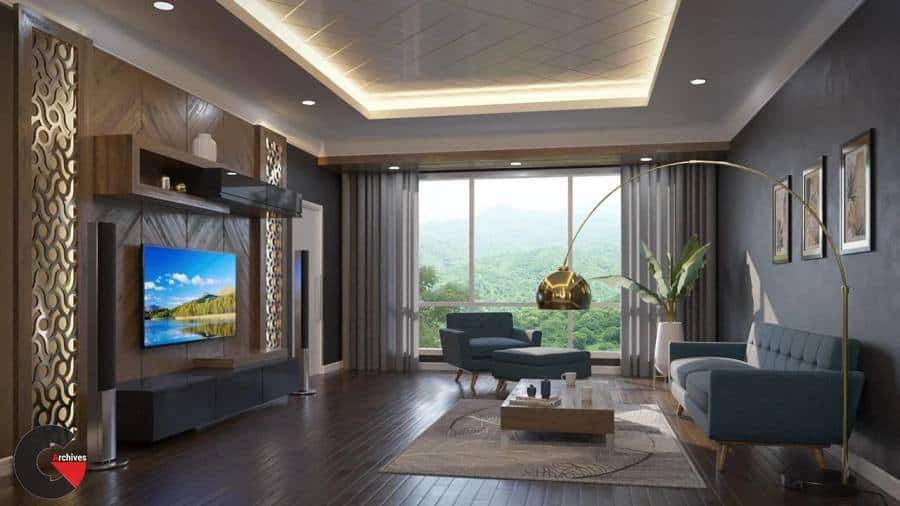
Architectural visualization with 3ds Max 2022 and Corona Renderer 7 : In this online course, you will learn how to use 3ds Max and Corona renderer to create an interior scene from scratch. If you never used 3ds Max before or even used any 3d software before, don’t worry, because we will start from level zero. We will cover the essentials and then move up gradually to the more advanced stuff. This is the final result of the interior project that you will create in this course.
I guarantee you, in sha Allah, you will be able to create this 3d rendering if you follow the course from start to finish. Besides access to the lesson videos, you will also get the project files. They are 3ds Max files with all the related files such as textures and Photoshop files.
THE CURRICULUM
There are so many things that you will learn from this course. It will be too long to explain all of them in this short video. You can check the curriculum section if you want to dig deeper. But, just for a quick preview. There are a total of 15 chapters in this course.
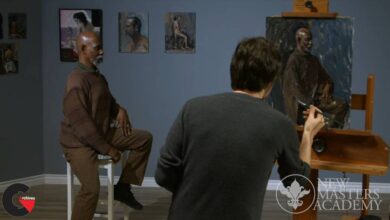
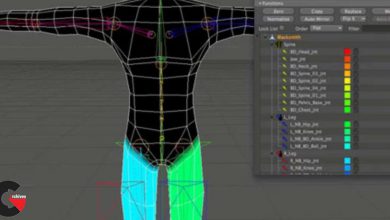
In the first chapter, you will learn the UI of 3ds Max. You will learn viewport navigation and different display settings. In the second chapter, you will learn basic object operations such as creating, modifying, transformations, selecting, duplicating, etc. In the third chapter, you will learn scene management techniques, such as using the scene explorer, using layer, grouping, etc. In the fourth chapter, you will start learning 3D modeling using the editable poly object. You will learn different ways to create selections. And many different modeling commands such as extrude, inset, bevel, bridge, connect, cut, slice, and so on. Next, in chapter 5, you will learn precision modeling techniques. You will learn how to use the real measurement units, learn to use snapping, object alignment, etc. Then in chapter 6, You will start working on the interior project. You will model the picture frame, the coffee table, the TV, the shelves, the floor, the wall, the ceiling, the door, and the window. In chapter 7, you will learn 3d modeling using spline objects. You will learn different spline vertex types. Learn to create splines and modify them using many different techniques. And then learn to use modifiers to convert the splines into 3d objects. In chapter 8, you will continue working on the interior project. You will create the curtain, the floor lamp, the 3d pattern, the backdrop, the crown molding, the plinth, the loudspeaker, and so on. In the next chapter or chapter 9. You will learn the basics of subdivision modeling techniques. And then in chapter 10, you will apply the subdivision techniques to model a teacup object. And then model the sofa for the interior project. You will start with the leg, then the seating, the cushion, and finally the backrest part. In chapter 11, you will start learning how to use materials. Starting from the basic concepts. How to use the material editor, material map browser, using multi-sub-object material, creating your own material library, and so on. In chapter 12, you will learn the essentials of the Corona renderer. Learn how to create different lighting types, learn to use the Corona physical material, Corona interactive rendering, render element, masking, etc. In chapter 13, you will continue the interior project. You will add the Corona camera to the scene. Adding the environment lighting, and then the interior lights. And also adding basic materials. Next, in chapter 14, you will learn texturing and UV mapping. Learn how to use PBR textures with the Corona material, UV projection mapping, UV unwrapping, and the real-world map size feature, etc. Finally, in chapter 15, you will add textures to the interior scene. You will learn how to use the Corona material library. Add custom PBR textures to the floor and carpet. Learn how to optimize instantiated multi sub-object materials. Learn how to UV unwrap the armchair model. And then finally, render the project and create the final composition in Photoshop.
After completing the course, in sha Allah, you will have solid skills in using 3ds Max and Corona Renderer. You can apply the skills later not only for interior projects but also for other architectural visualization projects in general. I hope you find this course interesting and beneficial.
Direct download links 5.4 GB :

Direct download link reserved for subscribers only This VIP
Dear user to download files, please subscribe to the VIP member
- To activate your special membership site, just go to this link and register and activate your own membership . >>>register and activate<<<
- You can subscribe to this link and take advantage of the many benefits of membership.
- Direct downloads links
- No ads No waiting
- Download without any limitation ، all content in website
CGArchives Is The Best
Review
Review
Review this tutorial